Mary Morgan Voice Artist Branding Logo

Mary Morgan

  • Home
  • Demos
  • About
  • Videos
  • Testimonials
  • Clients
  • Vocalist
  • Blog
  • Contact

booth

Voice Over Life: Building My StudioBricks Booth part 1

January 22, 2022 by MaryMorgan

Alright folks, many, many people have been asking for this and it’s finally here: my StudioBricks booth.

Expect quite a few pictures!

You can find another post about why I chose StudioBricks over other sound booth products on my blog.

For this post, I’m discussing the process of putting it together in a two-part series.

Ready?

Warning: I am NOT a sound professional. Everything in this post and the next one are based on lots and lots and LOTS of research as well as input from colleagues and professionals in audio.

Ok, when I ordered my StudioBricks booth I was very careful to choose a triple-wall studio pro. So, to begin, I analyzed the most quiet space in my house or apartment.

Was there lots of traffic outside? Lawnmowers? Planes flying overhead? Those are situations that can’t be controlled, unfortunately, so now and then I’ll just have to wait them out. Thankfully most are distant and occasional; however, it did no good treating my space for recording because of a 60 Hz hum in my walls, which is common in older houses. It interfered heavily with my recordings, and was very difficult to edit. Over time the hum increased and I got tired of seeing my wave files distorted. That led me to the decision to get a sound booth.

While some clients are ok with booths, some are not and have expressed frustration with editing audio from sound booths. I’ve determined that if my space still isn’t good enough for a client then I’ll have to go to a professional studio. So far, I don’t think that’ll be the case.

After choosing my area I had to measure where I’d build the booth and be super precise with what I wanted. The ceiling height is important in this as well when putting the booth together, literally piece by piece. If too low it would be a problem. Thankfully my room has a slanted ceiling which I’ve been told is a good thing. I ordered a 5 x 6 x 7 foot booth in size with the purpose of having a good amount of space to stand, sit, or move. Experts in audio told me NOT to get a booth that was squared, so I went with something more rectangular. When I sought advice from fellow VO talent who also owned a StudioBricks most suggested a triple wall to be safe. As since I can’t predict where I’ll be in the future (new house in the suburbs, new apartment in a busy part of town, etc.) I decided to get the triple wall.

I sent in my order feeling good about my decision and waited 3 months for delivery. Originally it was suggested the time frame would only be 2 months. However, when it came time to ship the goods from Spain, the port dock workers had gone on strike and thus delayed my order for another month.

During a vacation to Lake Tahoe with my boyfriend, I received news that the booth had arrived at my house in a massive crate the size of a van. Here’s a picture to prove it.

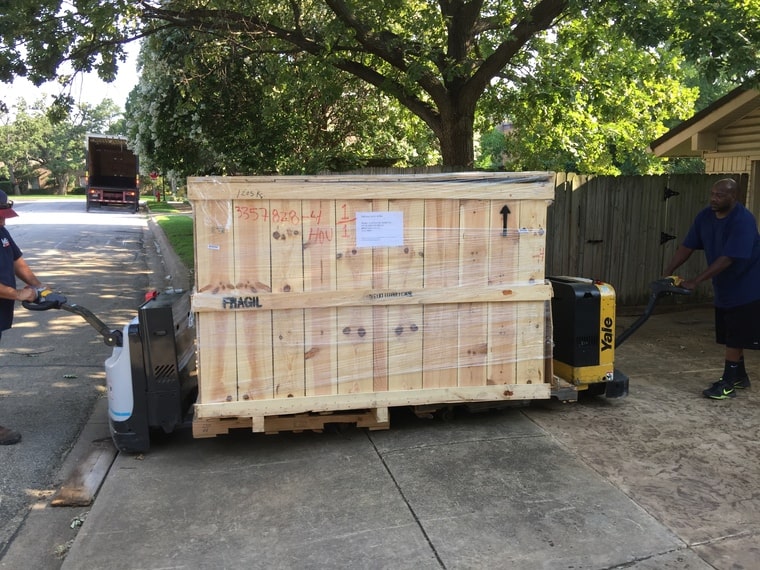
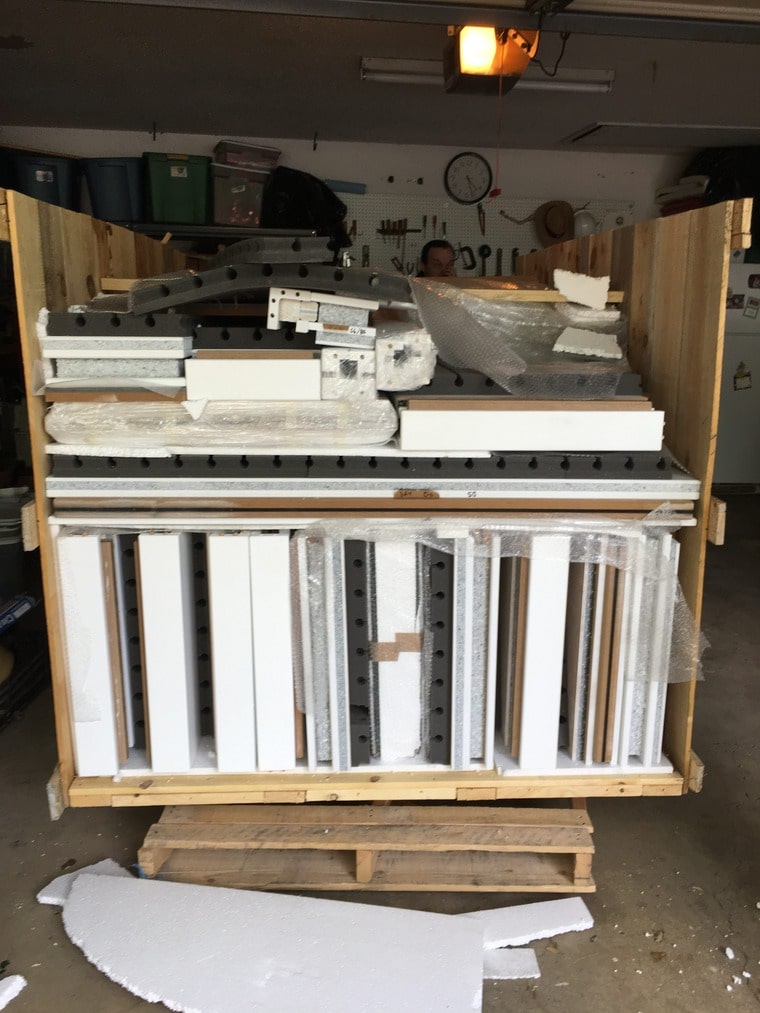
I was prepared for this monster of a box and had planned weeks ahead to have the garage cleared out so we could store it in a safe place. After getting home and adjusting back to my routine, it was time to put it together.

My brother and my boyfriend were my helpers in this for the first round (that’s right, I’ll explain later).

My brother determined that my chosen space wasn’t adequate due to the ceiling height. So, we chose a different side where the slanted ceiling went upwards. Boy was that a WISE idea!

Next was the first phase: The floor

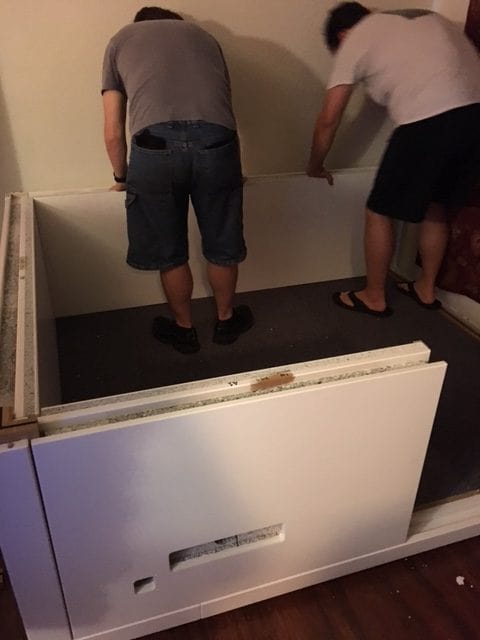
I have wooden floors instead of carpet so I had no need for holders. The booth came with adjustable feet to hold the outer frame together. So, we put together the outer layers so as to put the floor boards on top of them. That’s when the excitement came along of how easy it was to place everything together.

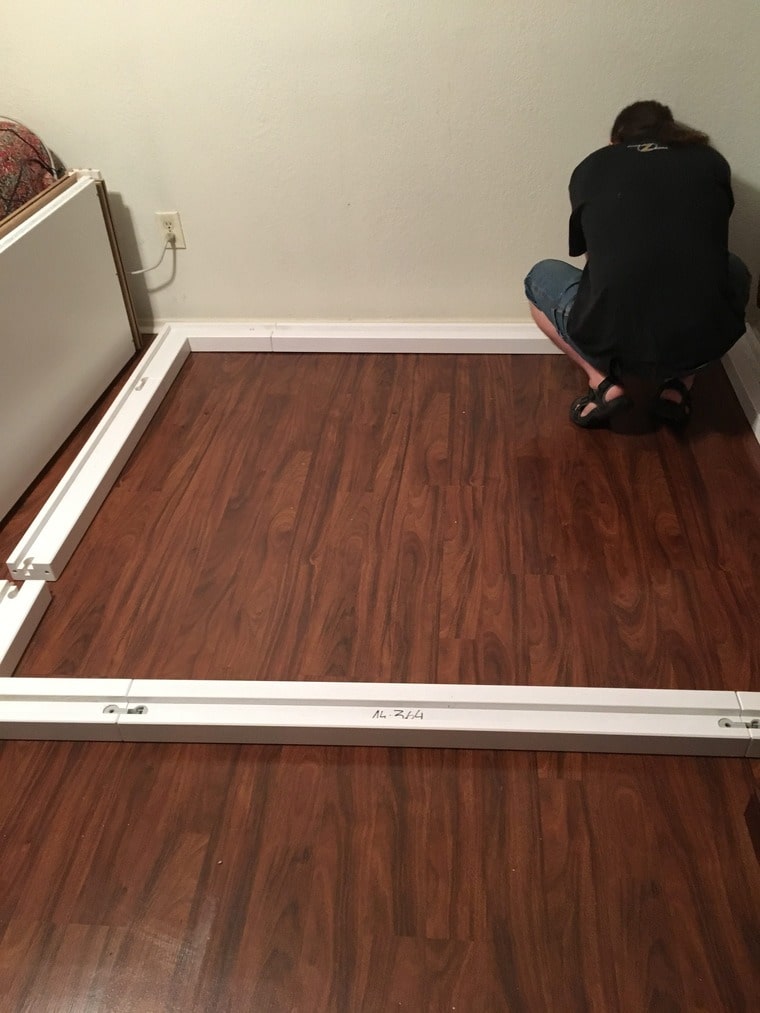
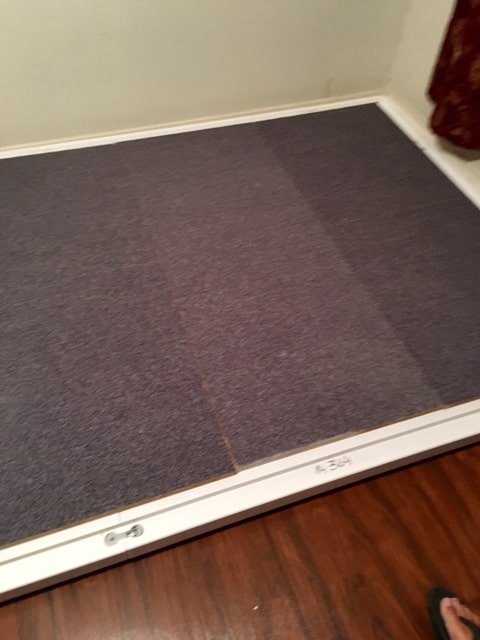
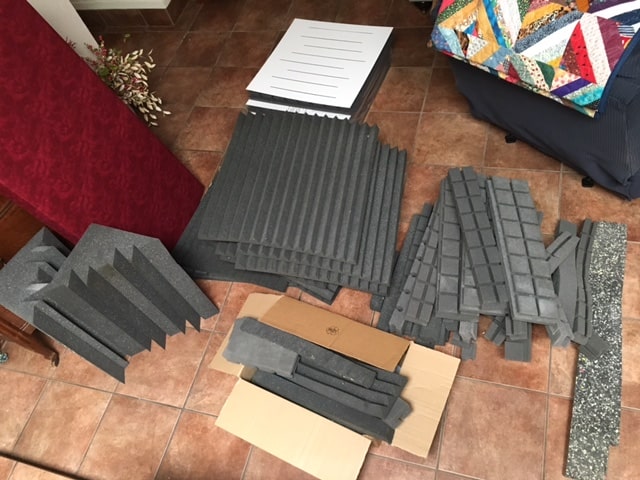
The bottom section of the booth was marked with letters and numbers: the A section, the B section, the C section and the D section. We began with putting A1 through A5 on first. There was no need for screws or nails. The pieces fit like giant Legos (but are called bricks) and held together by use of wooden staffs in corners and in between spaces on top so that other pieces could fit on top of them. It took the gentle use of a rubber mallet to ensure the staffs were fitted in place. Then came the B section, which we assembled by repeating the same process for the A section.

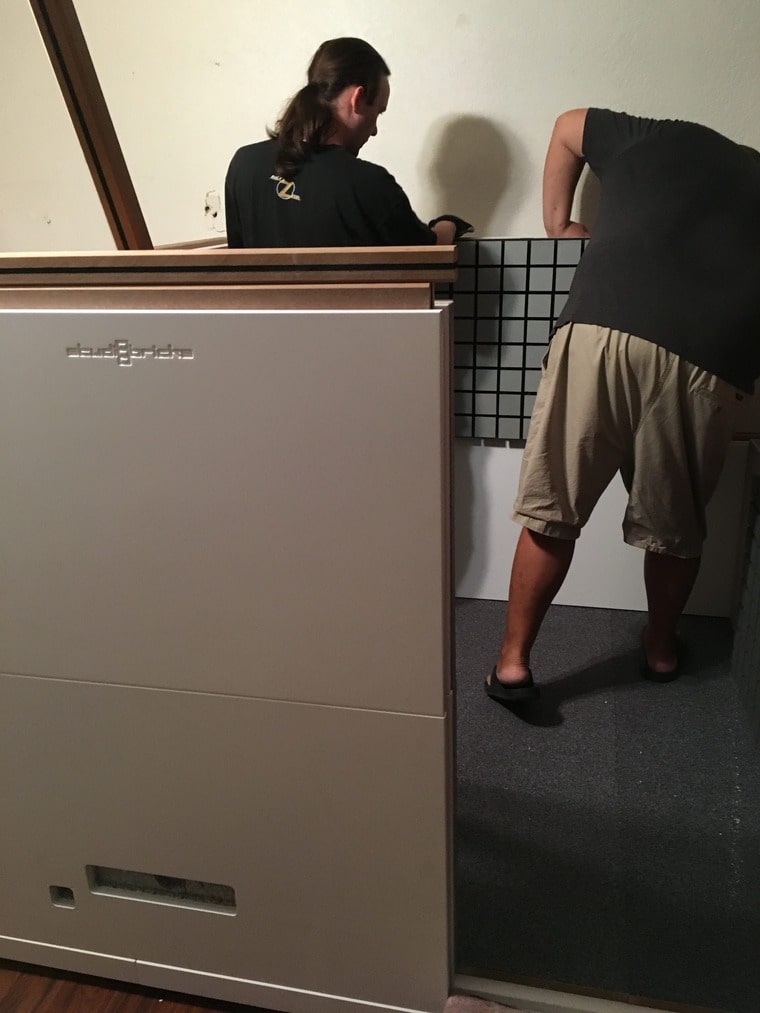
After that came the part that everyone owner of a StudioBricks booth warned me about: The dreaded door. Some of my colleagues have glass doors, but I chose to have a wooden door. Whichever one you go with know this: it will be HEAVY! Do NOT handle this piece on your own, mine weighed 175 pounds. It took my brother, my boyfriend, my father and me to get it out of the crate, then carried into the house, to my room, and finally to secure it onto the booth. At that moment, I realized what a blessing it was to live in a one-story house. And if I ever decide to get an apartment, it’ll have to be on the first floor.

With the door in place it was time to add the sections marked with letter C and how many pieces came with it.

Then, we discovered that there weren’t enough wooden beams to keep the C pieces locked in place. That delayed building the rest of the booth for a week in a half.

The folks at StudioBricks were extremely helpful and rushed not one but two extra wooden beams just in case.

When they arrived my brother and my boyfriend added the final section marked as D which was mainly the top walls and ceiling parts. By this time the worst was out of the way, meaning the leftover pieces weren’t as heavy.

So, depending on your strength, expect most pieces to have dense structure. It’s not recommended whatsoever to put this together on your own.

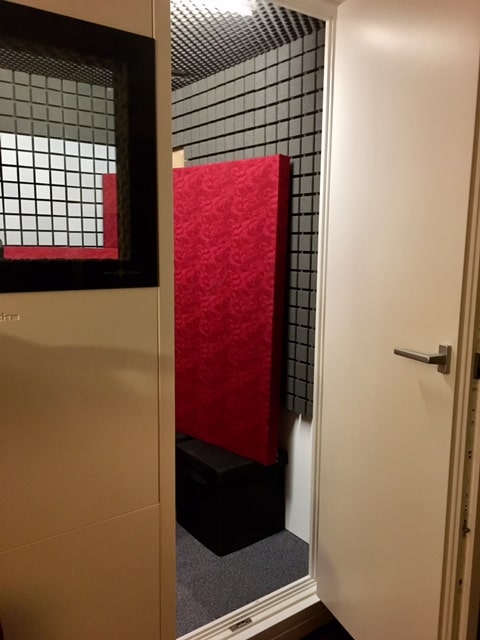
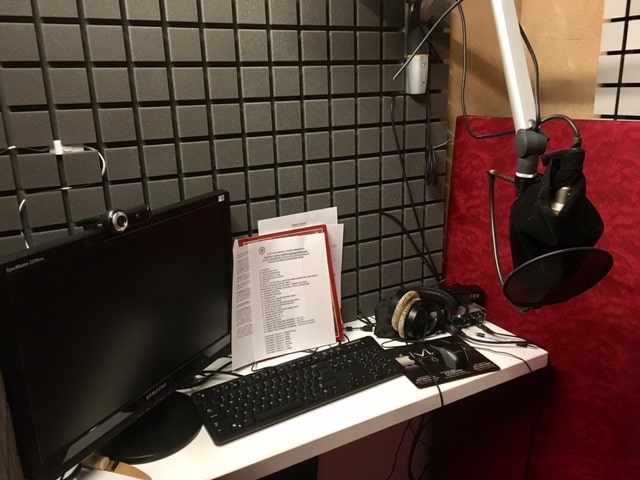
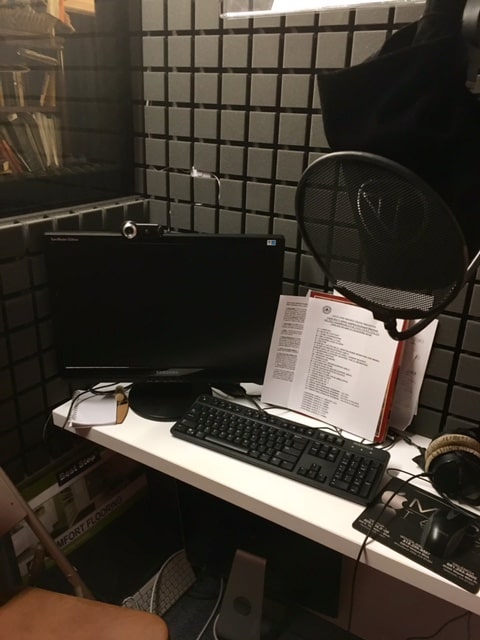
Once done. It looked MARVELOUS! As you can imagine, I couldn’t wait to get in there to record samples and auditions.

However… something was wrong. And because of this detail, we had to take it apart piece by piece and put the entire thing back together again!!!!!!!!

To find out what was wrong and how we fixed it, stay tuned for part 2!

Filed Under: Voice Over Tagged With: booth, building, Commitment, Hard Work, heavy, home recording, home studio, house, ideas, professional, recording, recording space, recording studio, sections, soundbooth, studio, StudioBricks, VO, Voice Acting, voice actor, voice actress, voice artist, Voice Over, voice over artist, voice over career, voice over studio, voice over talent, voice over website, work

Voice Over Life: Building My StudioBricks Booth part 2

January 21, 2022 by MaryMorgan

Continuing from my last post with Part 2 of putting my StudioBricks booth together. If you haven’t read it yet, I suggest doing so to keep up with what I’m sharing here.

I had put my studio together with the help of my brother, my boyfriend and my Dad. It looked amazing and was quite cozy inside. However, after all the unloading, and putting it together one section at a time (which took maybe 3 hours), there was a problem.

The floor was creaking.

Each time I stepped in or moved my feet around, the wooden boards on the outer floor frame made slight scraping sounds that I knew would interfere with recording and be a pain to edit out. After speaking with the great folks at StudioBricks and my good friend Jerry Pelletier, who was instrumental in helping me understand the fine points of how to assemble it, we realized the floor was uneven. Now, foot holders came with the package and were easy to adjust. Unfortunately, we neglected to measure each area to make sure the sides were even. There was only one solution to treat the problem: Taking it apart piece by piece and starting all over again.

For this round, my boyfriend and two of our friends helped. We started from the ceiling, and took the whole thing apart from top to bottom. Once we got to the floor we spent 30-45 minutes making sure the feet were adjusted accordingly, and that each side was even. Then, we added foam beneath the floor boards. It’s not necessary to use expensive Auralex foam. We used cheap bedding foam from Walmart. We had to apply something heavy for the middle board for a while since it kept trying to pop up. But now it no longer needs pressure to keep it down. We walked on it several times to make sure the creaking was gone. I can occasionally hear a tiny scrape when stepping inside, but it doesn’t stick around. Now I can sit, stand and move without worry that noises will interfere with recordings.

We assembled each section yet again, starting from sections label A1 to A5, then B1 to B5, then C1 and C5 and onward.

Despite how exhausting the process was of putting it together, then taking it apart and building it back up, it was totally worth it!! I love going inside to record now. I don’t hear planes flying overhead, I don’t hear the 60 hz hum in the walls and I don’t hear my PC.

Some tidbits worth sharing about my experience thus far:

-I specifically asked the manufacturers not to include the aeropack fan. They assured me that it’s silent. However, it’s really not. Even still, they sent the fan anyway, free of charge. I don’t use it.

-The subject of airflow in the booth is an important discussion. At the moment, I have nothing filtering air outside in. It’s a process still in the works.

-I didn’t use all the foam that the booth came with, not even the bass traps. In fact, most of that stuff is in my closet. Quite a few people said to use the bass traps on the corners, but because they’re solid foam, I worry that they’ll make me sound boxed in with the foam already built on the walls. So, for the time being I have sound panels positioned around me, which I made with compressed fiberglass boards wrapped in calico cloth from a fabric store. I’d like to have one positioned above my head on the ceiling, as I’m not crazy about the egg shell foam above my head.

-I don’t like the desk that came with booth because when I sit to record and brush against the edge of the table it rattles a bit. It’s left in there for now, until I can find something better. I recommend a wooden table with wobble-proof legs.

-The window is left uncovered for the time being, but if I hear too much reflection when I’m shouting for games or animation, I’ll cover it temporarily with some foam or moving blankets.

-If you get a chair, make sure it too doesn’t rattle when you sit or shift in it.

-If you get a booth of any kind, I recommend going with a rectangular space, not square. If you have doubts, contact home studio professionals like George Whittam, Dan Lenard, or Dan Friedman. If you Google their names, you’ll get great info.

It’s still a process to make it just right, but the booth is finished and I love it!

If you decide to specifically go with a StudioBricks booth consider the following:

-Know the exact size you want, and the space in your apartment or house for it. Measure out how much feet it’ll take and keep in mind the booth will weigh over 2,000 pounds. Be sure your floor can hold that amount of weight!

-Don’t rely on foam alone to fix all your problems acoustically. The booth will need more treatment no matter what. Some complain that the booths are too much of a pain to treat, but others say it’s great. I like mine so far.

-There are single-wall, double-wall and triple-wall booths. Don’t just consider the space you have now, especially if you plan to relocate. It’s more expensive, but I went with a triple wall so as to not worry about potential problems at future locations when I move to. Remember, this is an investment.

-A wooden door or a glass door? I don’t suffer from claustrophobia so I went with a wooden door so that I could mount a panel or foam on it if necessary. A glass door would cause too much reflection and I can’t hang a panel or glue foam on it since the surface would be damaged.

-Do NOT assemble the booth by yourself. Find friends or if need be, hire help.

-MAKE SURE THE FLOOR IS EVEN before assembling the whole thing!!

That’s my journey. So far no one has complained about my recordings. As I said earlier, I’m still going to make tweaks and changes here and there. It’ll never be perfect, but so far it’s helped a lot!

If anyone has questions, please feel free to ask them and I’ll do my best to answer.

Filed Under: Voice Over Tagged With: Acting, booth, Commitment, Creativity, Hard Work, home recording, home studio, ideas, inspiration, Knowledge, Learning, practice, presentation, professional, recording, StudioBricks, VO, Voice Acting, voice actor, voice actress, voice artist, Voice Over, voice over artist, voice over career, voice over studio, voice over talent, voice over website, work

Voice Over and Recording from Home

February 13, 2017 by MaryMorgan

Do you record at home in a small closet or room, buy a whisper room, build a home studio from scratch, or invest in a booth?

I’ve recorded in all kinds of spaces at my house and in professional studios, but these days you MUST be able to primarily record at home. No excuses, no exceptions. There’s no need to spend thousands of dollars; however, that can also depend on your location and outside environment. If you live in a nice quiet suburb, then a good closet space will do fine. But if you’re able to hear a 60 Hz hum in the walls from electricity, planes flying over your house or leaf blowers and lawn mowers every other day, you’ll need to find ways to work around them. [Read more…] about Voice Over and Recording from Home

Filed Under: Uncategorized, Voice Over Tagged With: Advice, booth, Creativity, home recording, home studio, Knowledge, practice, pros and cons, recording, Studio Bricks, VO, Voice Acting, voice actor, voice actress, voice artist, Voice Over, voice over artist, voice over career, voice over studio, voice over talent, voice over website, whisper room

Primary Sidebar

Categories

  • Creativity
  • Krav Maga
  • Music
  • Uncategorized
  • Voice Over
  • Yoga

Archives

  • January 2022
  • September 2021
  • January 2019
  • December 2018
  • May 2018
  • March 2018
  • February 2018
  • January 2018
  • November 2017
  • October 2017
  • August 2017
  • July 2017
  • March 2017
  • February 2017
  • January 2017
  • June 2016
  • April 2016
  • September 2015
  • August 2015

©2025 Mary Morgan // Voice Over Site by Voice Actor Websites

marymorganvoice@gmail.com
817-845-7862